Production Deployment
Complete guide to deploying Lite Claw in production.For a quick first deployment, see Quickstart. This guide covers the full production setup.
Architecture
Run three Railway services: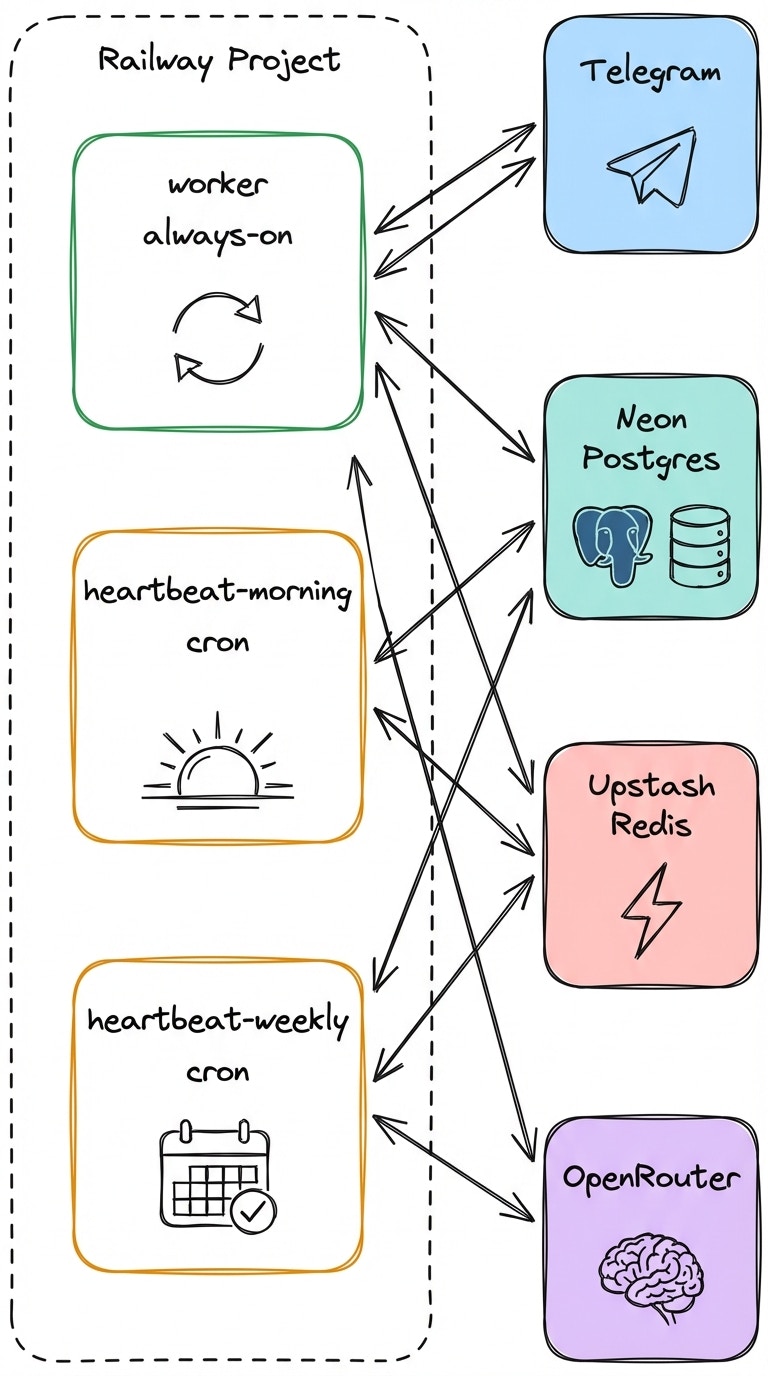
| Service | Command | Purpose |
|---|---|---|
worker | pnpm start | Telegram long polling, auth, agent loop |
heartbeat-morning | pnpm heartbeat:run | Morning briefing (cron) |
heartbeat-weekly | pnpm heartbeat:run | Weekly review (cron) |
Why do cron services run every minute?
Why do cron services run every minute?
The heartbeat job checks
heartbeat_jobs.schedule_cron and the user’s timezone at runtime. It only sends if actually due. Duplicate sends are prevented with Redis slot keys.This pattern avoids Railway cron granularity limits while keeping timezone handling in application code.Prerequisites
| Service | Purpose | Free Tier |
|---|---|---|
| Railway | Hosting | $5 credits |
| Neon | Postgres | Yes |
| Upstash | Redis | Yes |
| OpenRouter | LLM API | Pay-as-you-go |
| Google Cloud | OAuth (Calendar, Gmail) | Yes |
Environment Variables
- Required
- Optional
- Cron Services Only
| Variable | Description |
|---|---|
TELEGRAM_BOT_TOKEN | From @BotFather |
OPENROUTER_API_KEY | API key with credits |
DATABASE_URL | Neon Postgres connection string |
UPSTASH_REDIS_REST_URL | Upstash Redis REST URL |
UPSTASH_REDIS_REST_TOKEN | Upstash Redis token |
OWNER_CLAIM_CODE | Secret code to claim ownership |
OWNER_CLAIM_PEPPER | Salt for hashing claim code |
PUBLIC_BASE_URL | Your public domain (for OAuth callback) |
TOKEN_ENCRYPTION_KEY | 32-byte base64url key for encrypting tokens |
GOOGLE_OAUTH_CLIENT_ID | Google Cloud OAuth client ID |
GOOGLE_OAUTH_CLIENT_SECRET | Google Cloud OAuth client secret |
Generating TOKEN_ENCRYPTION_KEY
Google OAuth Setup
Create OAuth Client
In Google Cloud Console:
- Create a new project (or use existing)
- Go to APIs & Services → Credentials
- Create OAuth client ID (Web application)
https://www.googleapis.com/auth/calendarhttps://www.googleapis.com/auth/calendar.eventshttps://www.googleapis.com/auth/gmail.readonly
Deploy
Create Railway services
Create three services in your Railway project:
worker— Start command:pnpm startheartbeat-morning— Cron service, command:pnpm heartbeat:runheartbeat-weekly— Cron service, command:pnpm heartbeat:run
Set environment variables
Add all required variables to each service. For cron services, also set
HEARTBEAT_JOB_TYPE.First-Run Setup
After deployment, set up your bot in Telegram:Validate
Run through the Go-Live Validation checklist before considering the deployment complete.Known Limits
- Token encryption key rotation requires users to reconnect integrations
- Calendar event extraction is heuristic-based; edge phrasing may need clarification
- Only Google Calendar/Gmail and OpenWeather are integrated; other providers are optional extensions
Next Steps
Validation Checklist
Full go-live checklist
Runbook
Day-2 operations and incident response